

With the addition of “from home” as the most optimal suffix to a plethora of tasks, be it in work lines, learning sector, or training sector, the virtual world is the new hub. Thanks to platforms like Microsoft Teams that have eased the hefts of video conferencing with a large number of participants at the same time providing options such as screen sharing. Talking of screen sharing, a lot of netizens oft-times get perplexed over how to share screen on Teams. So if you are also wondering how to share screen on Teams, give this article a read.
Sharing PPTs and desktop screens has never been this easy as it is with Teams. The platform provides alternate options that allow sharing of 4 distinctive formats. Scroll down a little to know about that…..
How To Share Screen On Teams On Desktop
Microsoft’s Teams being one of the most compatible platforms with a plethora of devices, be it cell phones, computer systems, or mac, is used radically across the globe. This is how to share screen on Teams on desktop:
- Join a meeting on the Microsoft Teams app by fulfilling the sign-in requirements.
- You’ll find the ‘Share Content’ tab icon
 beside the red-colored ‘Leave’ tab on your screen. Click on it.
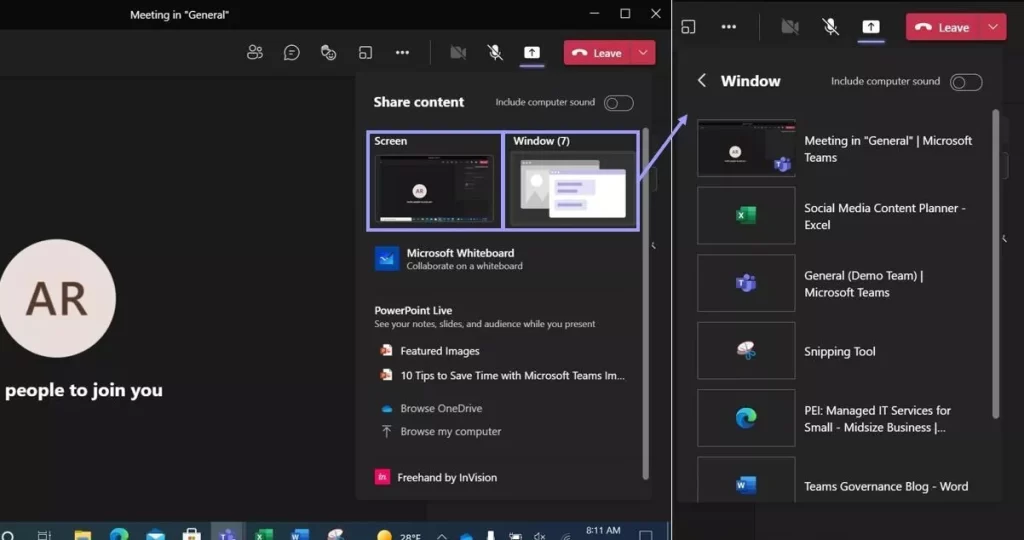
- Once you click the ‘Share Content’ tab, you’ll come across a few options enlisted right in front of you:
- Screen/Desktop
- Windows
- PowerPoint Live
- Microsoft Whiteboard
The ‘Screen’ option will allow you to present the desktop screen to the participants, whereas the ‘Windows’ option will let you present the particular window that is open on your end in real-time. The ‘Windows’ option is mostly used when sharing an app screen.
It is quite clear that the ‘PowerPoint Live’ option would do for you if you wish to share a PowerPoint presentation. Or else, you can also choose to work on a whiteboard which is no less than the most adored school time blackboard using the ‘Microsoft Whiteboard’ option.
Pick the option that fits best to your requirements bit by bit.
- Then, your screen will be shared with other participants in the virtual meeting. A red outline will encompass the screen area that would be shared. This will ensure that you have a proper idea of what exactly is being shared among your teammates. And yes, be assured that your notifications won’t be visible to anyone.

- When you’re done with your task, simply select the ‘Stop Sharing/Stop Presenting’ option in the toolbar displayed at the top of your meeting screen. In case the toolbar doesn’t appear on your screen, move your cursor and locate the option in the drop-down box displaying inside the toolbar. Or else, you can go an alternate way. At the bottom of your screen, there will be a square icon with an X appearing inside it just next to the mic icon. Click on it, and your screen-sharing session will stop then and there.
How To Share Screen On Teams On Mobile Phone
Whether you use an android version or iOS, you can share your screen with other participants using this procedure:
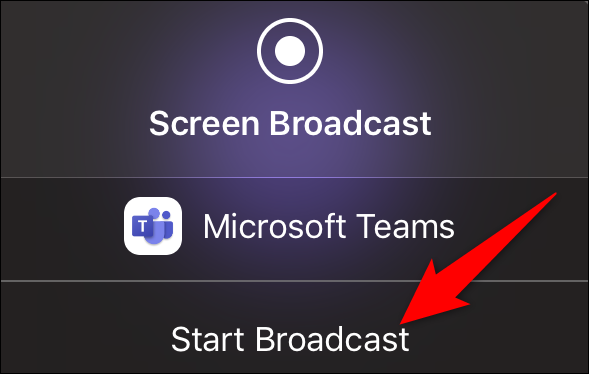
- While on Teams’ call, tap on the three dots (…) appearing at the bottom of your cell phone’s screen.
- Tap on the ‘Share’ option. You’ll see a number of options on your screen, namely:- Share Screen, Share Videos, Share PowerPoint, and Share Photos.
- Tap on ‘Share Screen.’ You might be asked to agree to the platform’s terms and conditions here, so move on by granting the required permissions.
- On the dashboard, tap on the ‘Start Broadcast’ option.
- Once you’re done with your meeting, go to the Teams’ meeting dashboard, and there, tap on the ‘Stop Broadcast’ option.
NOTE: Your notifications might be visible to other participants at the time of sharing your meeting screen. To avoid this from happening, you need to put your cell phone on ‘Do Not Disturb mode.’
Other Useful Features That Will Boost Your Screen Sharing Session Experience On Teams
- At times, you or the other controller (refer to the next point) might need to zoom the screen so as to make the content being shared more visible. Teams are at your rescue for such times. This can be done using the ‘Ctrl + Plus’ (for zoom in) and ‘Ctrl + Minus’ (for zoom out) keyboard keys.
- Also, it’s worth mentioning that you can share the control over your screen with a teammate or participant. There will be a separate toolbar or ribbon on the top of your meeting screen while it is being shared. If you can’t locate it, move your cursor, and it’ll be visible. In this toolbar, you will have the ‘Give Control’ option, among a plethora of other options. You need to click on this option to distribute control over your screen. Scroll down a little to know about steps that need to be followed further…..

After selecting the ‘Give Control’ option, you will be asked to provide the participant’s name to whom you want to pass this authority.
The participant will get notified from the Teams’ side about the same and will be able to add or remove the elements and alter the settings on the screen being shared.
You can withdraw the control anytime by selecting the ‘Take Back Control’ option.
- Following a similar procedure, you can ask for screen control over another participant’s screen by requesting them as well. Here’s how to do so:
Locate and click on the ‘Request Control’ tab in the toolbar while another person is sharing the screen.
The person on the other end will receive the notification, and if he/she accepts the request, you’ll get a notification about that, and then you will be able to add or remove the elements and alter the settings on the screen being shared.
When you no longer need the control, simply select the ‘Release Control’ option.