
It’s nobody’s first choice to get a grainy photo. Even if not all of us are pros at photography, today cell phone cameras are no less than top-notch DSLRs. Grainy photos are splendid in case you want your photographs to exhibit vintage vibes. Otherwise, you must know how to fix a grainy photo.
Grainy photos are the result of image noise or your camera’s high ISO setting. You must be wondering what is the reason that we get these unwanted dots (as irritating as pimples) in photos? Image noise distortion is caused due to unwanted signals which are kind of electronic fluctuations. This spreads specks on your photograph. On the other hand, the high ISO range, for instance, 3200 causes these grain-like effects to appear in the photo.
But these are not the only reasons that are responsible for grainy photos. Other than these two, camera quality, shutter speed, lighting, etc. are also to blame for ruining the images. Whatever the reasons are, you need to know how to fix a grainy photo. So without any further ado, let’s get started.
How To Fix A Grainy Photo
There are numerous ways to fix a grainy photograph. Here you go-
#1. Lower Your Camera ISO
Lowering the ISO range can save your image from getting distorted. Professional experts of photography suggest keeping the ISO range between 100 to 150. This will affect the aperture and shutter speed to some extent. The aperture and shutter speed altogether will affect the entrance of light into the frame. Remember that, while shooting or clicking the images indoors, you will need a relatively higher ISO.
#2. Adjust The Image Exposure
Adjusting image exposure is one among the post-processing alternatives if you’re willing to learn how to fix a grainy photo. Although this method is a little tricky and can even do the opposite if not applied correctly. But worry not, the trick is to not overexpose the image because it can ruin the illumination.
Moreover, be certain not to set ISO high for this because it’ll not work as expected. So increase or decrease the exposure using one F-stop and then click a photo.
#3. Opt For RAW Over JPEG
Many times, you will need to edit photos using noise reduction techniques on image editing tools such as Photoshop or Lightroom (more on how to fix a grainy image in Photoshop later). And that will not be that feasible all the time with JPEG format. That’s why you’ll need another file format and most RAW format is the most preferable. This is so because RAW format allows the best techniques for editing image post-processing.
#4. Use Noise Reduction Technique
The noise reduction technique is another helpful method to keep grainy effects at bay in images. Low levels of noise reduction do resolve this issue sometimes. However, professionals suggest keeping the noise reduction level moderate, neither too high nor too low.
#5. Look For A Well Lighted Spot
Lights! Camera! And Lights! You read that right. Lights are crucial for getting that perfect spark in the photo. So always keep external flash and lights with you to get rid of the grainy effect. Of course, this doesn’t mean that you need to light up all the areas around the subject, but yes, adequate lighting can surely make your images less grainy and more presentable.
#6. Use Plugins
A plethora of online plugins can help in cutting down the pixelated effect of images, to name a few- Photo Ninja, Capture One, PaintShop Pro, Photopea, Pixlr, Snapseed, etc. Some of these plugins work best with Photoshop, that’s what we are going to discuss next.
#7. How To Fix A Grainy Photo In Photoshop?
Before you begin to fix a grainy photo using Photoshop, ensure to save a copy of the same photo so that you can remake it with some other changes in the future.
- Open the photo file in Photoshop and hit the ‘Edit’ option.
- Click on the ‘Filter’ option.
- Go to the ‘Noise’ option and then hover over to the side panel where you’ll see a number of options. In case you can’t see the ‘Noise’ option, press the Option Key (for MacOS) or the Alt Key (for Windows) to view a grayscale image.

- Drag the slider to reduce the percentage of Reduce Color Noise, keep the percentage of Strength between 6 to 10, and bring down the Details percentage to 0 (zero) or until you get your perfect photo.
- Now select the ‘Remove JPEG Artifact’ option to have the Preview of the photo.
- Download the image and use it.
#8. How To Fix A Grainy Photo In Lightroom?
Keep in mind that the changes you’ll make to the photo in Lightroom will be applied to the whole of the image. Save a copy of the same photo for future use.
- Open the photo file in Lightroom and click on the ‘Edit’ option.
- Go to the ‘Develop’ mode and locate the ‘Details’ panel on the right side.
- Click the 1:1 icon in the toolbar to zoom the photo for editing.
- Check the options available under the ‘Noise Reduction’ panel.
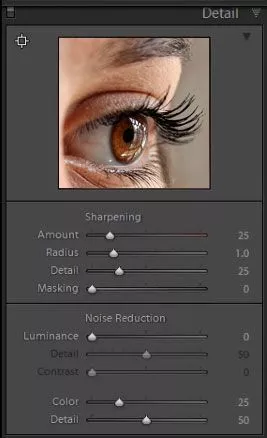
- Drag the slider to elevate the Luminance, and reduce Noise to give the image the desired effect. Bring down the Detail by 7 to 8 points and adjust the Smoothness.
- Download the photo.
You’ll see a major enhancement in image quality this way.
Grainy images spoil the ultimate effect of the whole picture. They make an image appear drastically pixelated and the most typical cause behind it is- noise reduction. The above-listed 8 ways can help you if you want to know how to fix a grainy photo.