
So you own a great idea for your next killer app. Well, that’s amazing! So how are you going to make an app? If you still haven’t figured that out, I will tell you how you can bring an app idea to life. Let’s dive into it directly without wasting much time:
How to create an app for android
1. Sketch an App Idea
Every app begins with an idea and who cares if it is big, small, ground-breaking or not (that’s not something one should be focusing on at this point although just the type of target audience has to be kept in mind). Just an idea to start with is good enough. So Sketch out the idea for your on paper and make it tangible.
Ensure defining how the app works or what features it will have, and so on. Well, the app features can be divided into 2 basic groups:
- The must-haves features which your app can’t be without, and
- The nice-to-have features which could be a great addition but not crucial.
When making an app, you want it lean and mean which means with a Minimum Viable Product (MVP). You are focusing on what matters and speed up the development process and it more resilient when it comes to setbacks. Some good app examples are:
- A note-taking app such as Bear
- A transportation app such as Uber
- A game app such as Two Dots
Moreover, the success of your app is estimated by “idea x execution” and an app with excellent work quality is better than any perfect idea.
2. Do Market Research
Never skip the Market research before you start making an app. You must have the following questions in your mind while researching:
- What alternative apps or your competitors are there in the marketplace?
- What does a potential customer need?
- How much should you charge for your app as per a good business model?
Two following type of market research is very useful to estimate the app demand:
- What mistakes have been made by your competitors?
- Are people looking for an app such as your app?
Rather than evaluating needs and wants, you need to get out there and converse with individuals. Who is your application for? How does your app sway a specific issue that clients are battling with? How are they as of now taking care of that issue?
In light of your examination, you can obviously characterize the issue your app deals with, and who you take care of that issue for. You utilize these bits of knowledge to make an application that serves its clients better.
3. Create Mockups of the App
Make mockups (a rough sketch of the app’s layout, flow and user interfaces (UIs)) before you build the app. Here I have an example: Below is an image with an outlined 3 important UIs in Balsamiq Mockups.

Mockups won’t include:
- Fine-grained UI elements
- Correct positioning of UI elements
- Complex color schemes or effects
A mockup furnishes you with what the application resembles not diverting one with superfluous things and gives the flow and interactions. When you’re making an application for a customer, making a mockup is a decent chance to demonstrate to them the final product before structure the application.
You can manage them through the UI; by utilizing the mockups and help them see and envision the total application. Try not to hold back on making mockups. A mockup causes you to fix essential UI/UX issues at an early stage, and it’s an extraordinary method to select your team, customer or business in your venture.
4. Make Graphic Design of your App
Now is the time of making graphic design for the app. Design of an app consists of pixel-perfect details, image assets, graphic effects, and more. I prefer two approaches in this case:
- Do it yourself with the use of a graphics template
- Opt for a skilled graphic designer
A proficient graphic designer can convey results 100x more noteworthy than a newcomer. As an application developer, you have to play to your qualities, and that implies re-appropriating work you’re not especially great at. Exploit stages like Upwork or Toptal to procure an expert. Moreover, you can use a design template which is made for iOS apps in order to save time.
Use a template’s for creating your preferred design, and customizes it. A few templates you can try are NOW, TETHR and DO, iOS 11 iPhone GUI from Facebook, Stark UI kit, Stitch, Phoenix, etc. Moreover, tools like Photoshop, Sketch, Affinity Designer, etc. can be used to make a graphic design for the app.
5. Build a Landing Page for your App
Never overlook or underestimate Marketing while developing an app because people should find it to make it a huge success. You must have a landing page for your app, for example, Crest is an app that explains what it does or who it is ideal for, and why it is a useful app. Their landing page has a call to action (CTA) in order to sign up for it and more.
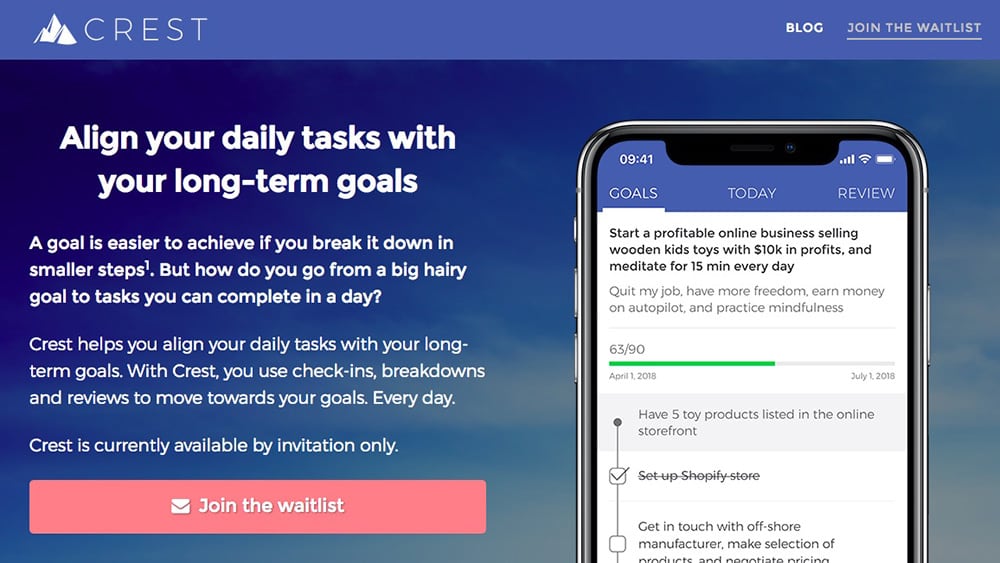
This is how you can connect with your app’s potential users earlier than expected and hence, ensure the following components on the page:
- A clear tagline at the top
- A brief written or video introduction
- An app screenshot or iPhone mockup
- A CTA (call to action) button to sign up or more
- A list of app features or benefits
- About Us section
The landing page basically works as a central point where you can lead visitors to if they want to learn more about the app. Moreover, efficient tools in order to build webpages such as WordPress, Strikingly, and Leadpages could be used. Also, none out of these mentioned tools need any HTML knowledge.
In today’s world, most of the app developers Melbourne see the App Store landing page as a mere channel for marketing their apps. Various among these work best along with a website and hence, you may consider creating a landing page while you’re developing your app.
6. Make your App with Xcode & Swift
After you’ve done your basic framework for your app, building the app becomes a lot easier itself. Now, you have got mockups created along with your app’s design, and you have also taken the very first steps when it comes to the marketing of your app using a website.
You will create iOS apps using Xcode and Swift. The Xcode IDE consists of a project manager, built-in documentation, code editor, debugging tools, and Interface Builder, which is a tool that you utilize in order to create the user interface for your app. Everything that you would require for making an iOS app. Moreover, Xcode operates on macOS only and hence, you’ll require accessing a Mac computer if you have got to make an iOS app.
On the other hand, Swift is intuitive as well as a powerful programming language. It’s the default programming language used to create iOS, tvOS, macOS, watchOS apps, etc. So if you have been learning iOS development, learning Swift in comparison to Objective-C is better.
App development could be divided into two categories:
- Front-end (that you can see): It includes layout, graphics, navigation, user interaction, animation, data processing, etc.
- Back-end (that you can’t see): It includes networking, databases, data storage, user management, etc.
While building the front-end, you build an app’s user interfaces and determine what has to happen if users interact with the app. You set up navigation and build an app’s features. The back-end basically stores data. Most of the apps today utilize cloud-based back-ends such as Firebase or Parse Server. When data (such as photos, tweets or social media posts), gets created in the app, it is uploaded to the cloud and saved in a database. The app keeps local data copies and updates them while the new data comes.
Moreover, you are integrating the front-end as well as the back-end. Think of creating a Twitter app. You create user interfaces in order to create or view tweets, and then you connect them to the back-end database. Here are a huge number of tools which can help in speeding up the app’s development process and for creating iOS apps:
- Interface Builder, Xcode, and Swift for iOS
- Balsamiq Mockups & Sketch for graphic design or UI/UX
- CocoaPods & libraries such as Alamofire, SwiftyJSON, and MBProgressHUD
- Firebase, Realm, Parse Platform, and Core Data for storage or/and databases
- Fastlane automates the app publishing workflow (between other stuff) PaintCode changes the visually designed UI elements to working Swift code
- The Apple Developer Documentation comes with really helpful articles, tutorials as well as documentation on almost every iOS component
- TestFlight helps to beta test your app, and with the use of it, you are able to distribute the app to about 10.000 devices
Moreover, a few online courses such as Zero to App Store come with the additional benefit of providing you access to a members-only community. Zero to App Store also provides you with 1-on-1 access to the course instructor and hence, you are allowed to ask questions whenever you need. So this is an amazing learning experience for the developers.
7. Launch Your App in the App Store
So, you’ve built your app and you are about to launch it. Well, then it’s time to launch your app in the App Store. Here is the process for the same:
- Prepare a title for the app along with metadata with iTunes Connect
- Upload the newest app build to the App Store with Xcode
- Apple reviews the app by following the App Store Review Guidelines
- Once the app is approved, it will be published live in the App Store
- DONE! Now, people are able to download and install the app
Making your app, and publishing it, is not just all that is needed. There is more to do especially after the early adopter feedback, which includes drawing board to improve the app, market research, improvising the mockups and designs, and more. You then launch the newest version of the app with the fixes in the App Store, and the cycle keeps on going.
Your app requires to be updated after some time. Also, you require promoting your app which has to start even before launching it. It’s crucial to generate some buzz before the app is launched. Here are a few ideas:
- Start your blog and make use of the content marketing for telling people about the app
- Ensure submitting your app to various curated platforms such as Product Hunt
- Publicize local and connect with influencers especially in your field
- Create a campaign for newer users of the app
- Make sure to optimize the keywords using App Store Optimization
- Focus on getting 1 user at first, then 10, 1000, 10.000 and so on
- Utilize the network effect in order to build a product which gets better while more people are using it, and make sure to help people share their experience on your app with others
- On Facebook, set up an App Install campaign, or just use Search Ads from the App Store
- Use SKStoreReviewController for asking your app users for a review
- Improve the app metadata as well as screenshots, and let people know about the benefits of your app
Whatever you plan to choose or do: keep at it. Moreover, consistency is crucial for any kind of work.
8. Market Your App and Reach Right Audience
App creators are problem-solvers and this is what makes them install as well as use the app. Moreover, marketing helps you in changing certain things, for example, replacing an old solution with a newer. As an app creator, you help people in this sort of transition. Developers frequently think that good items needn’t bother with promoting.
But it’s crucial that a user purchases the correct tool he/she is looking for. It’s intelligent, correct? What causes individuals to pick the iPhone rather than Android? Why buy a Tesla rather than a Volkswagen? Do individuals go to a 3 Michelin star restaurant on the grounds that they feel hungry? Marketing or Advertising is the voice that tells individuals your identity, a big motivator for you, and how you’re not quite the same as accessible choices.
Moreover, marketing is about trust, sympathy and making an association with individuals. So are you looking to market as an app developer? Yes, right? You need your ideas to expand, isn’t that so? Your app or product shows signs of improvement when the correct individuals benefit. Promoting is an approach to contact those individuals. Use it well, and don’t hole up behind rational thinking.
Well, you can start by asking the following simple questions:
- What problem is your app ready to solve?
- For whom your app stands?
- How to reach your correct audience?
Utilize the strategies mentioned before, such as writing on subjects identified with your app, or beginning a promotion ad campaign, or onboarding new clients. Help individuals find that your app is meant for their use. Building applications isn’t just about coding – it’s tied in with getting change going as well! In Zero to App Store, you gain proficiency with the fundamentals of app business and advertising, just as the learning iOS development.
9. Improve the App using User Feedback
Real user feedback is crucial to an app’s success and improvement. You can utilize user experience as well as their feedback by:
- Using the app analytics for gathering quantitive data
- Using surveys and interviews for getting qualitative data
- Talking to your users on a regular basis and to create a personal connection
The most effortless approach to get feedback on your app from the clients is to just send them an individual email to ask how they’re doing, and how they’re utilizing your app. You truly ask: “How are you utilizing my application?” You don’t inquire as to whether they like your application, or how they need to see it improved, or what they make of another component.
You can pose those inquiries; however, they’re probably going to provide you with opinionated answers. And all that you want are genuine answers. According to Steve Krug, you need to watch real clients as they’re utilizing your application. You can ask them what inspired them to make a specific move in your application, or what they expected subsequently, yet you don’t need them to think too hard about the inquiries.
The danger of running surveys as well as focus group is that individuals begin to consider what they’re supposing and make of how they would respond in specific situations. It’s smarter to place them in the situation you’re looking into, and watch what they do!
When you are done with a few of those feedback sessions, you will be recognizing interactions in your application that you thought would go in an unexpected way. You look at your desires against genuine outcomes and check whether they coordinate. Moreover, if they don’t, you either need to change your desires or change your app.
Note down the potential improvements and get them fixed in two categories mentioned below:
- Fix the obvious mistakes
- Fix the issues that are easy to fix
Try not to make it excessively complicated. Improve the things that should be improved, and launch newer app version quickly. The way of working with client feedback is by exploring different avenues regarding activities and results. Nobody realizes what works best until you’ve tried it, and estimated the outcomes. The speedier your pivot time on examinations and their upgrades, the quicker your application improves.
You would beta be able to test your application with TestFlight. Basically, welcome a few people to test your application, and send your next application work to them. You can welcome up to 10.000 individuals, and they can provide you with quick feedback on your most recent emphasis.
Top 15 Android Development Tools
Google Play store, according to statistics, had the availability of more than 2.8 million Android apps to download as of March 2017. This is basically more than 2.2 million by Apple App Store and 669,000 available apps by Microsoft Windows. Since there are so many Android mobile devices available in the market now than another operating system, the requirement for apps as well as an experienced Android app developer is continuing to rise.
Moreover, android developers can produce the applications quicker and all the more productively because of a bounty of refined, integrated development environments (IDEs) just as other efficient devices and applications. There are a couple of Android development solutions that will, in general, appear again and again on Android designers’ “top choices” records.
Here is a list of the top 15 Android application development tools:
1. Android Studio
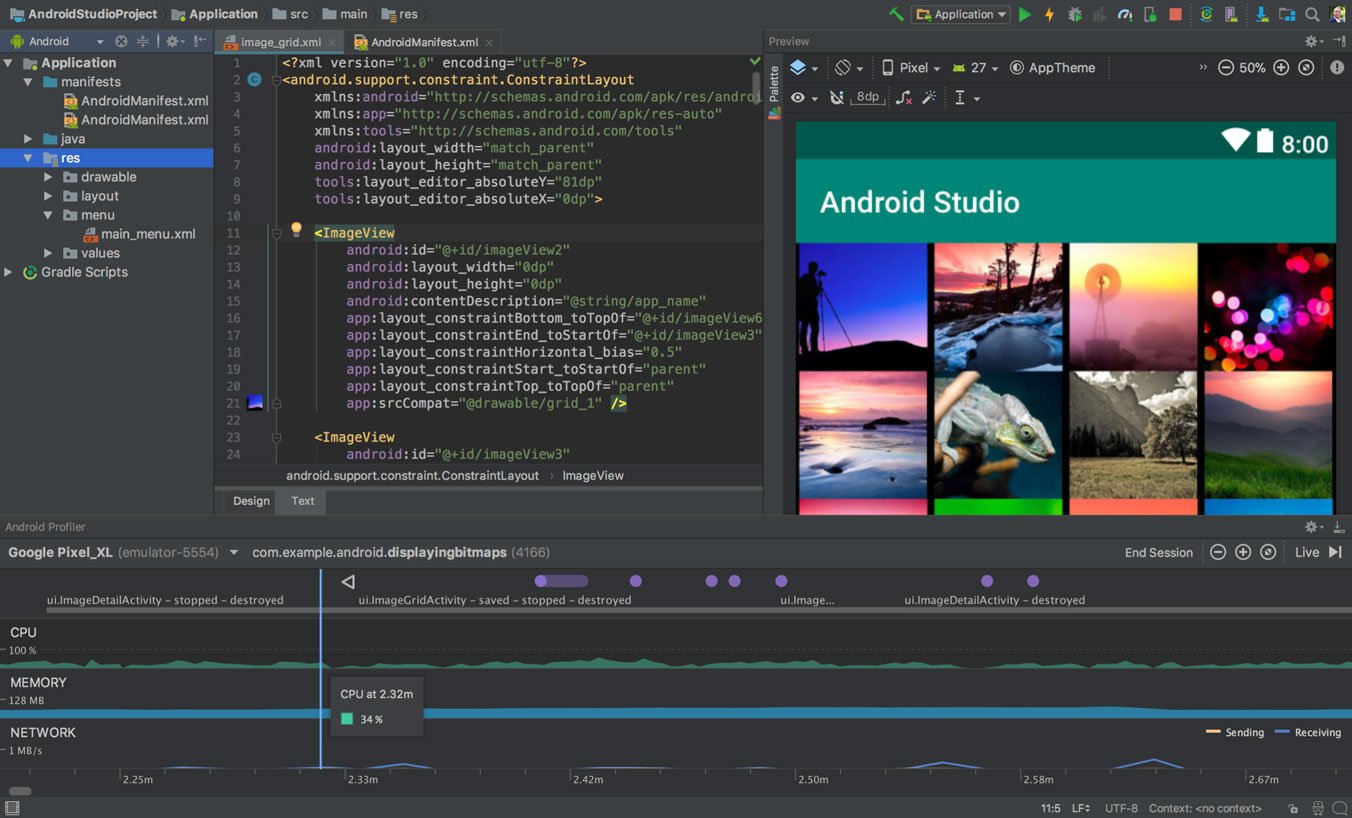
Being Android applications’ official integrated development environment, Android Studio always appears to top the rundown of favored tools for app developers.
Google made Android Studio in 2013. It supplanted – or would it be advisable for us to state it obscured? – Eclipse Android Development Tools (ADT) as the essential IDE for local Android app development. Android Studio gives code editing, testing tools, and debugging all inside a simple to-utilize simplified interface.
It is allowed to download and is upheld by Google as well as by a huge and effectively drawn in a network of Android app developers.
2. ADB (Android Debug Bridge)
Android Studio incorporates the Android Debug Bridge, which is like a command-line tool as well as “bridge” of association between Android gadgets and different PCs that can be utilized during the process of development and the general investigating and QA process.
By interfacing an Android gadget to the development PC and entering a progression of terminal directions, an app developer can make adjustments as expected to the two gadgets.
3. AVD Manager
Another valuable Android Studio feature is the AVD Manager, the Android Virtual Device’s short form. The AVD Manager is an emulator used to run Android applications on a computer.
This permits developers the capacity to work with a wide range of Android gadgets to test responsiveness and execution on various forms, screen sizes along with the resolutions.
4. Eclipse
As we referenced above before the Android Studio was Eclipse. Eclipse is the favored IDE for all Android application development officially. Despite the fact that Google never again offers support for Eclipse, numerous developers still use it to make Android and different cross-platform applications, as it works very well with various programming languages.
5. Fabric
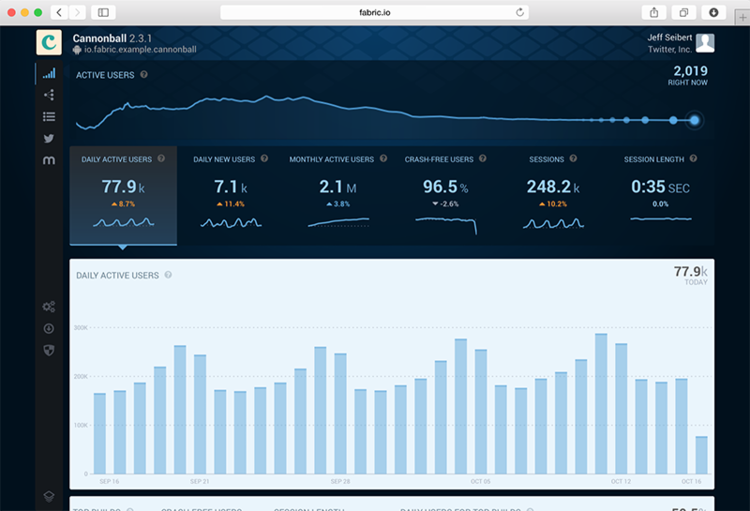
Fabric is the platform of development behind Twitter’s versatile mobile app. It enables developers to manufacture better portable applications by furnishing them with a suite of “kits” that they can pick and look over. These packs incorporate everything from beta-testing to promoting as well as marketing tools.
Google bought Fabric from Twitter in January of 2017. Uber, Spotify, Square, Groupon, Yelp, and all the more enormous name organizations have used Fabric in building up their mobile apps.
6. FlowUp
FlowUp lets you keep a look at the performance of your production apps. Handy dashboards allow you for keeping a track of the stats and metrics, which include CPU and disk usage, frames per second, memory usage, bandwidth, and so on.
Moreover, FlowUp is a SaaS solution which is monthly subscription-based and has pricing that is determined by the total sum of company users.
7. GameMaker: Studio
One of the most famous development tools for Android game developers is GameMaker: Studio. GameMaker permits you everything that you require in creating 2D games with the use of small code. GameMaker: Studio is a very user-friendly app which has an easy to use drag-and-drop interface. Moreover, it has been targeted to the beginner as well as novice gaming developers.
8. Genymotion
Genymotion, another Android emulator, helps developers to test and see an application on more than 3,000 gadget situations. It is famous among game developers since it accompanies pre-installed standard Android images and graphics that are very helpful in the testing procedure.
Genymotion additionally gives more prominent speed than testing an application on a real Android gadget. Genymotion also supports a wide range of programming languages as well as environments.
9. Gradle
In 2013, for Android applications, Google endorsed Gradle like a build system. In view of Apache Maven and Apache Ant, Gradle is one of the most prominent development tools for making enormous scale app including Java. Designers like utilizing Gradle related to Android Studio since it’s extremely simple to include external libraries utilizing one line of code.
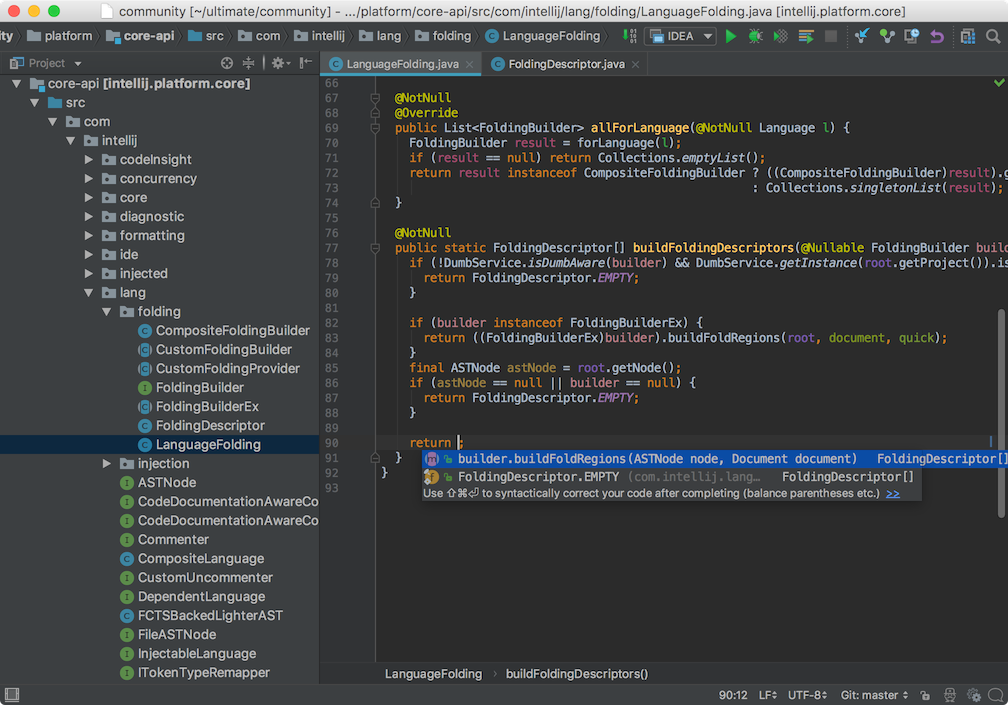
10. IntelliJ IDEA
From the JetBrains developers, IntelliJ IDEA is intended for extreme programmer productivity. It’s very quick and highlights a full development tools suite appropriate out of the case. Moreover, at $149/year, IntelliJ IDEA unquestionably isn’t modest.
In any case, there is an availability of free, open-source community edition and the fully extended variant is allowed for one year to students.
11. Instabug
Instabug is utilized by big names in the tech world, like Yahoo, PayPal, Lyft, BuzzFeed, and Mashable for beta testing as well as bug reporting. Instabug permits beta testers along with the user groups for sharing screen captures and detailed error logs with the app developers during the investigating process. You can try it for free in the beginning and then pay later as per your requirement.
12. LeakCanary
Created by the people behind Square, LeakCanary is an open-source Java library which lets you to simply identify and address memory spills in your application. At whatever point a break occurs, LeakCanary promptly tells you. At that point, you are able to use the built-in stack follow to fix the issue or issues.LeakCanary is accessible on GitHub.
13. Stetho
Stetho is basically a free open-source platform and an Android debugging tool that has been created by Facebook. This one allows you to access the Chrome Developer Tools feature which is native to your desktop browser. Stetho comes with a network inspection function to be used for image preview, exporting traces to the HAR format and JSON response helpers.
14. RAD Studio
This one is basically an integrated development environment that enables you to compose, accumulate, package, and deploy cross-platform apps. It offers help for the complete development lifecycle bringing about one source codebase that can be recompiled as well as redeployed. RAD Studio’s professional edition begins at $2,286.00. Moreover, a free of cost trial is additionally provided.
15. NimbleDroid
NimbleDroid is a platform for testing that enables you to check your completed Android application for memory leaks or bugs or different issues before publishing on Google Play and its alternatives platforms. Utilizing NimbleDroid opens up application designers’ time and accelerates the general QA process, getting the application to market quicker.
Organizations, for example, Yahoo, Mozilla, and Pinterest have all utilized NimbleDroid to test their apps. Moreover, there is an availability of customized pricing dependent on clients’ needs.