

Updates are meant to give the functionality of a total revamp, but this wasn’t the case for PlayStation 3 and PlayStation Vita consoles. Much to everybody’s surprise, Microsoft did leave everyone startled with the release of all-new PlayStation account management updates for its much-loved PS3 and PlayStation Vita versions from 3.74 to 4.89. No one expected that the latest upgrades to PSN would clear away a plethora of useful features of the console.
This isn’t the first time Sony called upon the PlayStation feature. The company’s PlayStation account management update that was rolled out in the preceding year averted PlayStation owners from making payments for purchasing games and other content via debit and credit cards. This was done to encourage the use of Playstation Network cards among the masses.
The latest upgrades have drawn out the power to create a new PlayStation account directly. Quite atypical, right? But wait, this is not just limited to this. Read through the article to know what more Sony Interactive Entertainment has served on your plate and how to deal with PlayStation account management.
WHAT HAS CHANGED?
Sony’s latest PlayStation firmware updates have basically revamped three major aspects, which we’ll discuss in this article one at a time. Here you go…..
- Firstly, these updates have restricted the creation of a PlayStation account directly. You have to take the road via a PC, laptop, or cell phone in order to get past this scenario.
- Secondly, it now requires 2-Step Verification for completing the sign-in process.
- Plus to the above two, the Japanese MNC has now obstructed some key functionalities under PlayStation Account management.
This article aims to trim down the hefts of PlayStation Account Management that one might come across at any point in time while using one of the most widely used consoles.
PLAYSTATION ACCOUNT MANAGEMENT
If you’re wondering what PlayStation account management deals with, chances are you are one among most of the other gamers who don’t give a single thought to the account management part of PlayStation until or unless you can’t do away with it. After all, you didn’t invest in this console to get tied up in learning about its basic functions. But PlayStation account management is better learned than delayed to avoid related problems and utilize it optimally.
How To Activate PlayStation Network (PSN)
On PlayStation Vita Or (PSVita) Console
- Using your local user account, then go to PlayStation Network.
- Sign in using your credentials.
- Click on “Account Management,” and go to “System Activation.” Here, highlight the “PS3” option and pick which type of content you wish to add to your PS3 console.

- Lastly, click on Activate System.
A confirmation message will be sent your way when the process gets done or if your limit has expired. You can also activate PlayStation TV by following the same way.
PlayStation 3 Or PS3 Console
- Go to PlayStation Network (PSN) through your local user account.
- Go to Sign-in and then click on the “Account management” option.
- Go to System Activation and then highlight the term “PS3.”
- After this, select what kind of content you no longer wish to keep activated on your PS3 (like video or a game).
- Click on “Activate System.”
Once the process is completed, you’ll be notified whether it’s activated or if your activation limit is already over for a certain kind of content.
On PlayStation 4 Or PS4 Console
- Go to PS4 Settings, then select Account Management.
- Now go for the “Activate as your Primary PlayStation Account” option and click on “Activate.”
On PlayStation 5 Or PS5 Console
- Under the “Settings” head, go to “User and Accounts” and click on “Others.”
- Select the “Console Sharing and Offline Play.”
- Click on “Enable.”
NOTE: You need to deactivate the already activated consoles before activating the other one.
How To Deactivate PlayStation Network
On PlayStation Vita Or PSVita Console
- You’ll find the “Settings” option on the home screen dashboard. Click on it.
- Go to “PlayStation Network” and select the “System Activation” option. For PS3, just highlight the “PS3” as you did at the time of activation.
- Opt for the specific type or kind of content that you no longer wish to avail of on the PSVita console.
- Click on “Deactivate,” and then click on “Ok.”
On PlayStation 4 Or PS4 Console
- Simply go to “Settings.” Then go to “Account Management.”
- Click on the “Activate as your Primary PlayStation Account” option.
- Click on “Deactivate,” then give your confirmation by clicking on “Yes.”
On PlayStation 5 Or PS5 Console
- Under the “Settings” head, go to “User and Accounts” and click on “Others.”
- Select the “Console Sharing and Offline Play.”
- Click on “Disable.”
How To Change Or Update PlayStation Sign-in ID
On Browser
- The first and foremost step for this is to sign in to PlayStation Account Management on any browser.
- From the sidebar, select the “Security” option.
- Click on “Edit,” and provide your password if asked.
- Then, enter the updated email address or new email ID that you wish to add.
- Click on Save.
- Lastly, you’ll receive mail in order to verify that you have made the changes. You need to entirely finish up this process after clicking on “Verify Now.”
On PlayStation 4 Or PS4
- Go to “Account Management” under the “Settings” head.
- Go to “Account Information” and sign in using your already registered email address.
- Provide the password if asked to do so.
- Enter the new email address that you want to update for PlayStation and click on “Confirm.”
- Now just confirm the prompted mail by clicking on the “Verify Now” button.
On PlayStation 5 Or PS5
- Under the “Settings” head, click on “User Accounts.”
- Go to “Account.”
- Sign in using your already registered Email ID. Remember your password, as this step might need it.
- Type the new Email ID and click on “Confirm.”
- Once you click on “Confirm,” you’ll receive an email. Click on the “Verify Now” button, and you’re good to go.
How To Add 2-Step Verification To Your PlayStation Network (PSN)
Undoubtedly, for most gamers, the decisions regarding PlayStation Account management changes were nothing but disappointment. Nevertheless, the 2-step verification is worth going the whole nine yards. It is an additional step that levels up your account protection.
On PS3, PSVita & PS4 Console
Before we proceed, you must note that some additional steps have to be taken in order to add 2-step verification for PS3 and PSVita. Scroll down a little to know about that…..
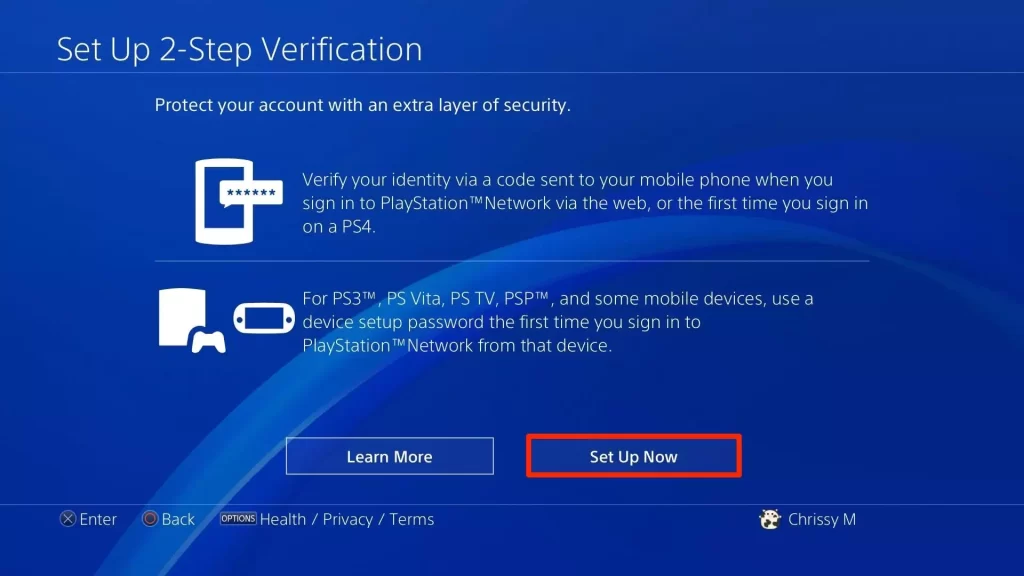
- Go to “Settings” and select “Account Management.”
- Select “Account Information.”
- On the new dashboard, go to “Security.”
- Hit on the “2-Step Verification” option and click on “Activate.”
- Next, you’ll be asked to pick a way you wish to receive the verification code as per your convenience. You can either receive it via text message or the Authenticator App. You basically need to scan the QR code on the app.
- Enter the code.
- At last, record the Backup Codes in a place so as to fetch them easily as and when needed.
Additional Steps
As we talked about, here are the additional steps that one needs to opt for while setting 2-step verification for PS3 and PSVita:
- Once you’re done with the above-stated steps, sign in to “Account Management” and select the “Security” option. Be certain to enable 2-step verification.
- Now, select “Device Setup Password.” then click on “Generate New Password.”
- Enter the verification code.
- If you don’t want to spare your time entering the device setup password every time you sign in, check or tick the box and enable auto sign-in.
- Click on “Done.”
On PlayStation 5 Or PS5 Console
- Under the “Settings” head, select “Users and Accounts.”
- Go to “Security,” and click on “2-Step Verification.”
- Next, you’ll be asked to pick a way you wish to receive the verification code as per your convenience. You can either receive it via text message or via an Authenticator App. You basically need to scan the QR code on the app.
- Enter the code.
- Go for recording the Backup Codes in a place so as to fetch them easily as and when needed.
On Browser
- On a connected device, sign in to “Account Management.”
- Select “Security.”
- Next, you’ll be asked to pick a way you wish to receive the verification code as per your convenience. You can either receive it via text message or via an Authenticator App. You basically need to scan the QR code on the app.
- Enter the code.
- Go for recording the Backup Codes in a place so as to fetch them easily as and when needed.
How To Set Up An Account In PlayStation
On Browser
- Go to the official Sony PSN account site.
- Click on “Create Account,” fill in your details and proceed by clicking on “Next.”
- Once you receive the verification mail, proceed further as per the instructions given in the mail.
And that’s all.
On PlayStation 4 Or PS4
- Long press the “PS” button on the console so as to see the Menu.
- Click on “Power” and then click on “Switch User.”
- Select “New User” and then click on “Create A User.”
- Do as per the prompt instructions, provide the required details and confirm the mail.
On PlayStation 5 Or PS5
On the home screen dashboard, click on your “profile picture.”
- Select “Switch User” and then go for “Add User.”
- Click on “Get Started” and then click on “Create an Account.”
- Fill out the details, and that’s it. Now you’ll be confirmed about activation by mail.
How To Sign Out Of PlayStation Network
On All Devices
- This requires signing in to PlayStation Account Management first.
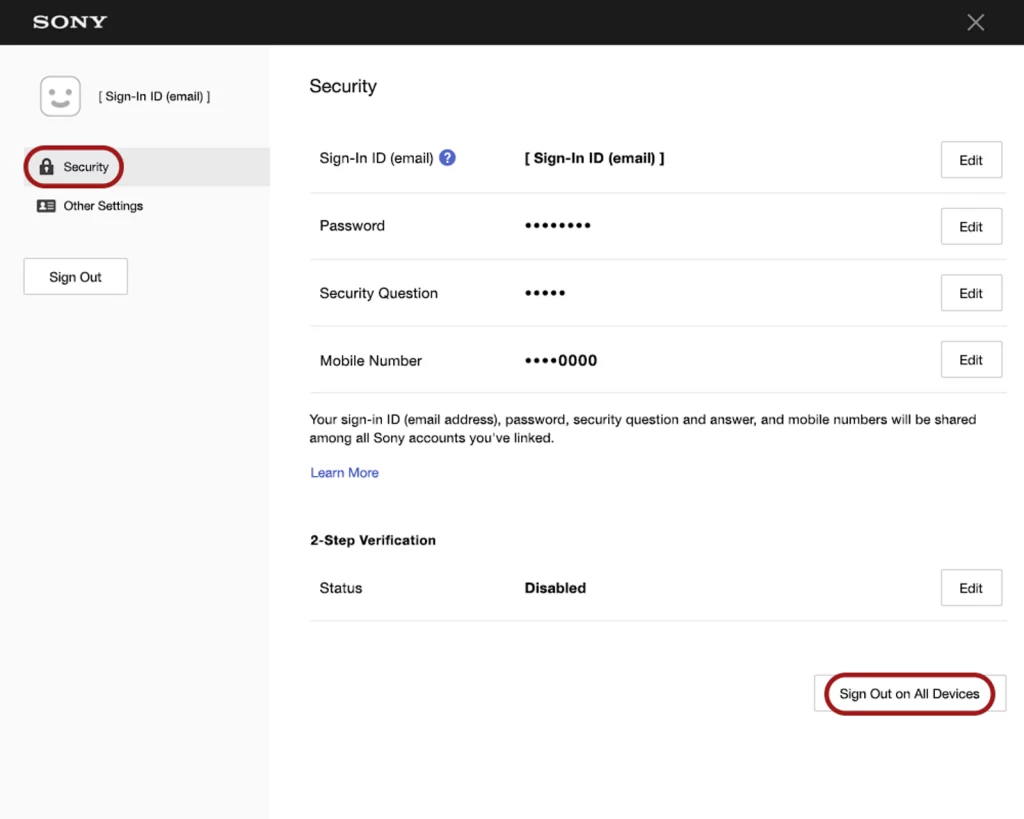
- Select the “Security” option. You can find it on the left side panel on the dashboard.
- You’ll find “Sign Out of All Devices ” right at the bottom. Click on this option.
On PlayStation 4 Or PS4 Console
Just go to the “Account Management” option under the Settings head. Then, hit the “Sign Out” button.
On PlayStation 5 Or PS5 Console
- Go to “Settings” and select the “User and Accounts” option.
- Select “Others” and then click on the “Sign Out” option.